Working with HTML Documents
HTML documents have a simple, common structure that forms the basis for
designing all Web pages. This basic structure of tags is shown in the following listing with
associated tags described in the following sections.
<!DOCTYPE html>
<html lang="en">
    <head>
        <meta charset="UTF-8" />
        <title>page title goes here</title>
    </head>
    <body>
        *
        page content goes here
        *
    </body>
</html>
Listing 1-9. A web page template.
As you begin coding an HTML page you can start with this template. In fact, you may wish to create this document and save
it as a template file. Then, when you start a new page, simply open this document, save it under the name of the new
page, and continue coding for the particular information to appear on that page.
The DTD
All HTML documents should begin with the prolog line shown in Listing 1-10. This first line is the Document Type Definition
indicating the W3C coding standard used for the page. In this case, the standard used was HTML version 5.
<!DOCTYPE html>
Listing 1-10. Web Page DTD.
The <html> Tag
The <html> container tag surrounds all HTML coding in the document. This tag indicates that the enclosed information
contains HTML coding and should be rendered as such in the browser. In conformance with HTML standards, the opening tag
includes the lang attribute that specifies the specific language used for the content: English (en).
<html lang="en">
Listing 1-11. The <html> tag.
The <head> Tag
The <head> container tag encloses the head section of the HTML document. The head section supplies a title for the document
(see below) along with other information related to the formatting and indexing of the document. For present purposes, only a
title appears in the head section. Other tags that can be included in the head section are discussed as needed.
<head>
    <title>page title goes here</title
</head>
Listing 1-12. The <head> tag.
The <title> Tag
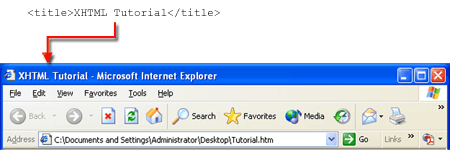
The <title> container tag gives a title to the document. This tag encloses a string of text that appears
in the browser's Title Bar when the page is opened. The <title> tag provides helpful page identification
information to the person visiting the various pages of your Web site. Note that <head> and <title> sections
are required for conformance with HTML 5 standards.

Figure 1-15.
Appearance of the <title> tag on the browser Title Bar.
The <body> Tag
The bulk of the coding of an HTML document appears in the body section surrounded by the
<body> container tag. Only information appearing inside this tag is displayed in the browser
window. In its simplest form, the body section contains plain text that is displayed in the
default font style inside the browser window. Browsers normally display text using Times
New Roman font face at approximately 1-em size.
All Web pages begin with this basic document structure. The <body> of the document is then expanded with text and other page elements
that are to be displayed inside the browser window. Various arrangements of these display elements as well as control over their
appearance are accomplished by enclosing them within additional HTML tags.
In order to view your work, it is not necessary to be connected to the Internet or to be linked to a server on the
World Wide Web. You can do all your work locally. If you happen to have an account with an Internet Service Provider
that provides personal home directories, then you can copy documents to your directory for viewing on the Web.
For purposes of this tutorial, you can create Web pages on your computer's hard drive, on a removable thumb
drive or diskette, and view the pages through your browser.
The Web pages created in these tutorials work correctly under Internet Explorer and other browsers that
follow W3C standards. You should download the latest version of the browser you are using.
Text Editing with Notepad++
HTML documents are created with text editors or with special HTML editors designed for that purpose. For these tutorials, it is sufficient to
use a simple text editor such as Windows Notepad++. After opening this application you enter the text and other page elements that you
wish to display, and surround them with HTML tags for layout and styling.

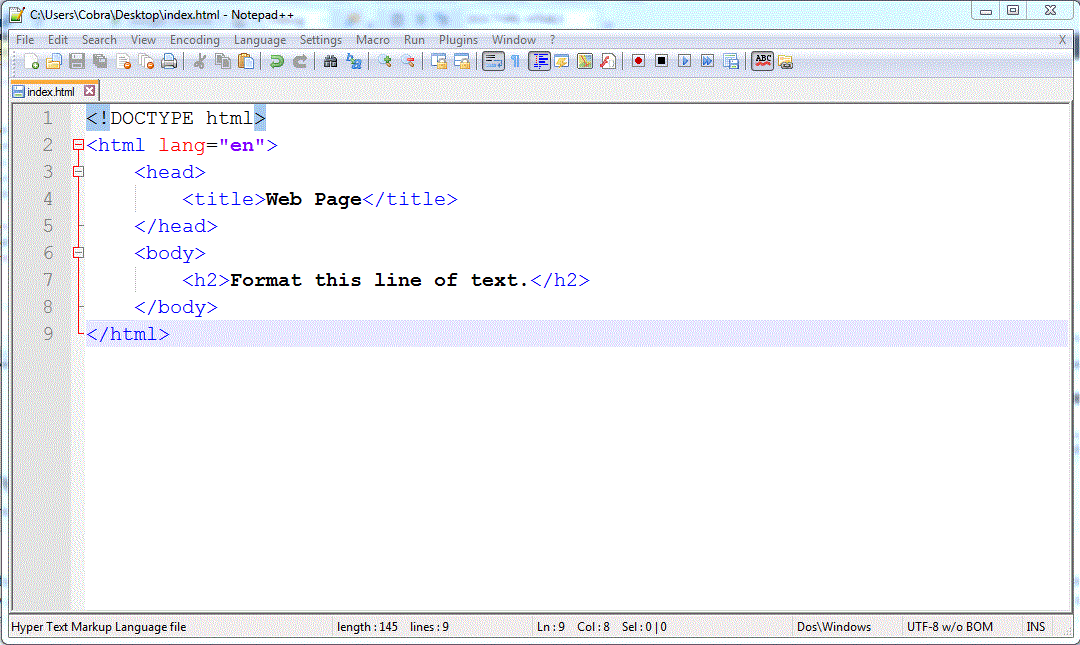
Figure 1-16.
The Notepad++ application with coding for a simple web page.
Text and coding is typed into the editor in free-format style. That is, blank spaces, tabs, indents, and other
document editing techniques can and should be used to make the document readable in the editor. These editing
layouts are ignored by the browser, which only pays attention to the HTML tags for page layout and formatting
instructions. The above code, for example, would be displayed properly in the browser if it were entered in
the editor as follows:
<!DOCTYPE html><html lang="en"><head><title>Web Page</title></head><body><h2>Format this line of text.</h2></body></html>
Listing 1.16. Consecutive spaces, line returns, and tabs are ignored.
However, it is easier to compose and edit the document and to understand the layout of the page by spacing its tags and text in a
more readable format. Take great care in alignment and indention of code so that it visually represents the structure of content
that displays in the browser. Sloppy code inevitably leads to errors. You should choose a monospace font such as Courier New for
displaying your code in Notepad++. The monospace font will better able you to align lines of text in the editor.
HTML coding is an exacting art and science. Accuracy of coding is paramount and you need to work with close to 100%
accuracy. The browser doesn't know what you "wish" to do; it can only do what you explicitly tell it. At first, coding
will be tedious and time consuming. As you practice and gain experience, you should be able to type and edit HTML code
with not much more difficulty than straight text.
Saving an HTML Document
Once you have completed coding the HTML document, you need to save it so that it can be retrieved and displayed inside a
browser. The document can be saved to your desktop, to a removable storage drive, or in a folder on your hard drive.
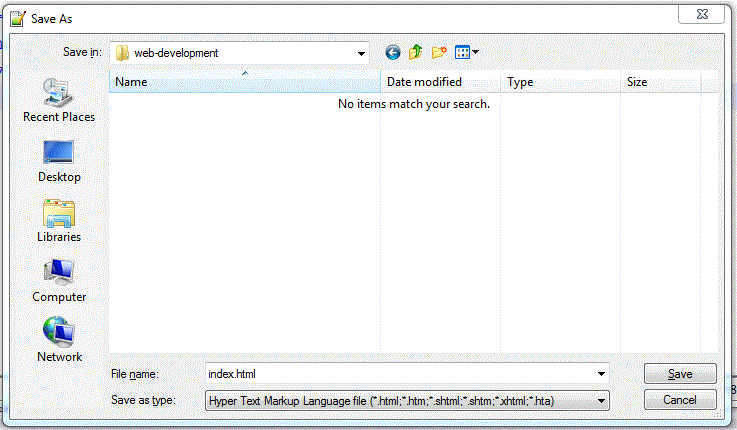
You can choose any file name you wish for your Web document, although you should not include any blank spaces or special
characters in the name. You also need to make sure that you save the document with the .html or .htm file extension. This
extension identifies the document as a Web page and it is needed for the browser to recognize it as such.

Figure 1-17.
Saving an HTML document under Notepad++
Displaying an HTML Document
The saved HTML document with the .html extension is now ready to be viewed in your browser. You can open the document
directly in the browser by double-clicking its icon, or you can open your browser and use the File menu to navigate to
the correct drive, folder, and document. When the document is loaded into the browser, the address appearing in the
Address box of your browser indicates this path to the document.
Document Editing and Display
When composing a lengthy Web page, it is not necessary to code the entire page at one time. You can code a
few lines, save the document, view the page in the browser, and then return to composing the next section of
code. In other words, you can switch back and forth between the editor and the browser as you put together
your Web page. Just start with the document template described earlier so that you are editing a
complete, valid Web document.
To facilitate this sort of page development, leave both your editor and browser open on the desktop so that
they are accessible in the Task Bar. Then you can making changes or corrections to your document and switch
immediately to your browser to refresh and view the updated page.
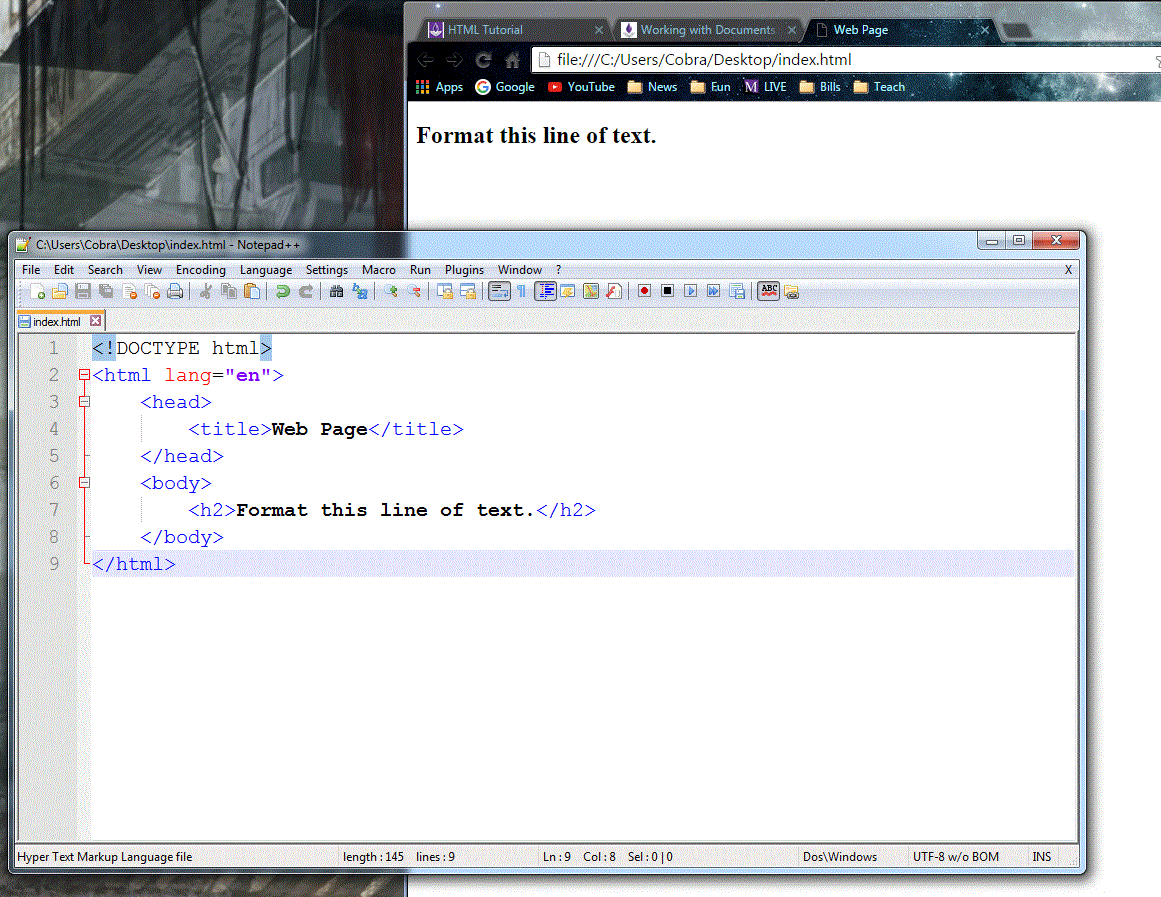
The following illustration shows the computer screen with both Notepad and the browser opened at the same
time on the desktop. It is now a simple matter of clicking in the Notepad window to edit the Web document.
After saving the changes, click in the browser window and click the Refresh button to reload the changed
document. Now switch back to Notepad to continue with page development.

Figure 1-18.
Web page editor and browser open on the desktop.