Borders and Padding
Nearly all HTML elements can have borders, and can include padding (white space) around
their contents. This is the case whether or not there are normally borders around the
element or whether padding space is a normal characteristic of the tag.
Border Styles
Border styles include properties pertaining to the type of border, its width, and its
color. The following table lists these properties.
| Property |
Value |
border-style
border-top-style
border-right-style
border-bottom-style
border-left-style
|
dashed
dotted
double
groove
inset
none
outset
ridge
solid
|
border-width
border-top-width
border-right-width
border-bottom-width
border-left-width
|
thin
medium
thick
npx
|
border-color
border-top-color
border-right-color
border-bottom-color
border-left-color
|
#000000 - #FFFFFF
color name
rgb(r,g,b)
|
|
border
|
border:style size color
|
Figure 6-15. Border styles and properties.
Border style, width, and color properties can be applied to all four sides
of an XHTML element or they can be selectively applied to individual sides.
For example, the five types of border style properties are
| border-style | - applies to all four sides |
| border-top-style | - applies only to the top edge |
| border-right-style | - applies only to the right edge |
| border-bottom-style | - applies only to the bottom edge |
| border-left-style | - applies only to the left edge |
When a border specification applies to all four sides of an element, the shortcut
border property combines and separates with spaces the following values within a
single property declaration: style, width, and color, in that order. In other words,
instead of coding the three separate specifications,
border-style:solid
border-width:1px
border-color:black
these settings can be combined within a single border property:
border:solid 1 black
All three of these values do not have to be given, but the remaining ones must be in the
correct order: border:solid 1px (unspecified color).
There are eight border styles from which to choose. These styles are shown in Figure 6-16
with their widths set to 3 pixels. Smaller border widths do not display some of the styles.
solid
dashed
dotted
double
groove
inset
outset
ridge
Figure 6-16. Border styles.
Borders are normally applied to tags such as <div>,
<p>, and <span> tags, those that are containers for
text. You can, however, experiment with other tags to see their border effects.
To illustrate styling variations, the following division is displayed with a border
that has different styles on all four sides. The division encloses a paragraph that
has its own border settings and includes a text string with its own border.
<style type="text/css">
div#A  {border-width:7px;
        border-color:red;
        border-top-style:solid;
        border-right-style:dashed
        border-bottom-style:ridge;
        border-left-style:double}

p#B    {border:dashed 3px blue}

span#C {border:solid 4px green}
</style>

<div id="A">
  <p id="B">This is a <span id="C">text string with borders</span>
  inside a paragraph with borders inside a division with four different
  borders.</p>
</div>
Listing 6-15. Code for various border styles.
This is a text string with borders inside a paragraph
with borders inside a division with four different borders.
Figure 6-17. Borders surrounding page elements.
Since the enclosing division displays different borders on each of its four sides,
individual specifications are given for each side. Since identical borders appear
around all sides of the paragraph and spanned text, the shorthand border property
is declared for these containers. Although you probably will not go to this extreme
in adding borders to page elements, this example shows the different border settings
that can be made.
Border Radius
An alternative to regular borders would be the use of border-radius. This property
adds a beveled appearance to the corners of the contents of a container.
Unlike regular borders, border-radius allows more customization. For instance, with
this property, you can customize every corner at once, each one individually, or you
can use a combination of beveled and regular corners to achieve a varied look.
Additionally, containers styled using border-radius can still have a regular border
around it. Figure 6-19 shows examples of these applications.
The style properties for adding a border-radius to a container is shown in Figure 6-18.
| Property |
Value |
border-radius
border-top-left-radius
border-top-right-radius
border-bottom-left-radius
border-bottom-right-radius
|
npx
nem
|
Figure 6-18. Borders surrounding page elements.
It is worth noting that while the border-radius property works well on container
elements, such as div or span, it does not always display properly when applied
to images. Therefore, to achieve an rounded corner appearance on an image, it is
sometimes necessary to first wrap the image in a containing element, such as a
div or span, and apply the border-radius property to that.
<style type="text/css">
div#A
	{
	width: 5em;
	height: 5em;
	background-color: red;
	border: solid 2px blue;
	border-radius: 1em;
	}

div#B
	{
	border-top-right-radius: 2em;
	border-bottom-left-radius: 2em;
	}

</style>

<div id="A">
</div>


<id="B" img src="DinosaursWithLasers.jpg">
Listing 6-16. Code for adding border radius to various objects.

Figure 6-19.
Border-radius application examples.
Padding Styles
In the above styling example, borders are collapsed around the text they enclose.
In most cases, for visual attractiveness and readability, you will wish to leave space
between the text and its border. This is accomplished by introducing padding
inside the text container. Padding is the amount of space between the borders of a container
and its enclosed content.
Padding is added to a container with the style properties shown in Figure 6-20. The
padding property introduces white space around all four sides of the container;
padding-top, padding-right, padding-bottom, and padding-left selectively apply
padding to each of the four sides.
| Property |
Value |
padding
padding-top
padding-right
padding-bottom
padding-left
|
npx
nem
|
Figure 6-20. Padding style properties.
The following code is a repeat of the previous division with padding added to
the <div>, <p>, and <span> tags
to introduce additional space between the text and its enclosing borders. Different
effects can be achieved by specifying different padding amounts on each of the four sides.
<style type="text/css">
div#A  {padding:7px;
        border-width:7px;
        border-color:red;
        border-top-style:solid;
        border-right-style:dashed;
        border-bottom-style:ridge;
        border-left-style:double}

p#B    {padding:7px; border:dashed 3px blue}

span#C {padding:2px; border:solid 4px green}
</div>

<div id="A">
  <p id="B">This is a <span id="C">text string with borders</span>
  inside a paragraph with borders inside a division with four different
  borders.</p>
</div>
Listing 6-17. Code for adding border radius to various objects.
This is a text string with borders inside a paragraph
with borders inside a division with four different borders.
Figure 6-21. Padding surrounding text elements.
Image Borders
Borders can be displayed around a picture by coding a border style. The following
code produces a ridge border 7 pixels wide as shown on the left in Figure 6-23.
<img src="Stonehenge.jpg" style="border:ridge 7px red">

Figure 6-22. Pictures with borders.
You cannot separate the border from the picture by introducing padding around
the picture itself. You can enclose an image inside another container, say a
<span> tag, and add padding to this container. This technique
is coded below and shown on the right in Figure 6-23.
<span style="border:ridge 7px red; padding:10px; display:inline-block"><img src="Stonehenge.jpg"></span>
Listing 6-18. Code for padding surrounding an image.
Margins, Borders, and Padding
The illustration in Figure 6-23 gives you a visual sense of the margin, border, and
padding components of page elements. Each of these component parts can be sized the
same around all four sides of a container, or individual sides can take on different
measurements. In combination with container size and placement styles discussed, next
you should be able to arrange and style containers for very precise placement and for
enhanced readability of page content.
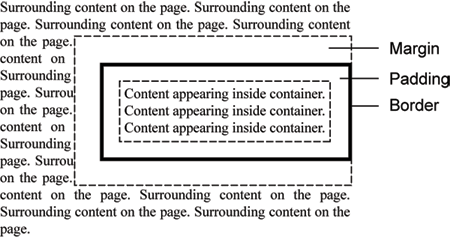
Figure 6-23.
Margins, padding, and borders surrounding page elements.