The Document Object Model
The document object is associated with the Web page appearing in the browser.
When a web page is loaded, a document object model (DOM) is created by the browser.
It is a property of the window object and is also an object itself which includes children objects, properties, and methods that permit JavaScript's control over the look and feel of the current HTML document.
The HTML DOM is often represented by using a tree of HTML objects as shown in Figure 8-1.
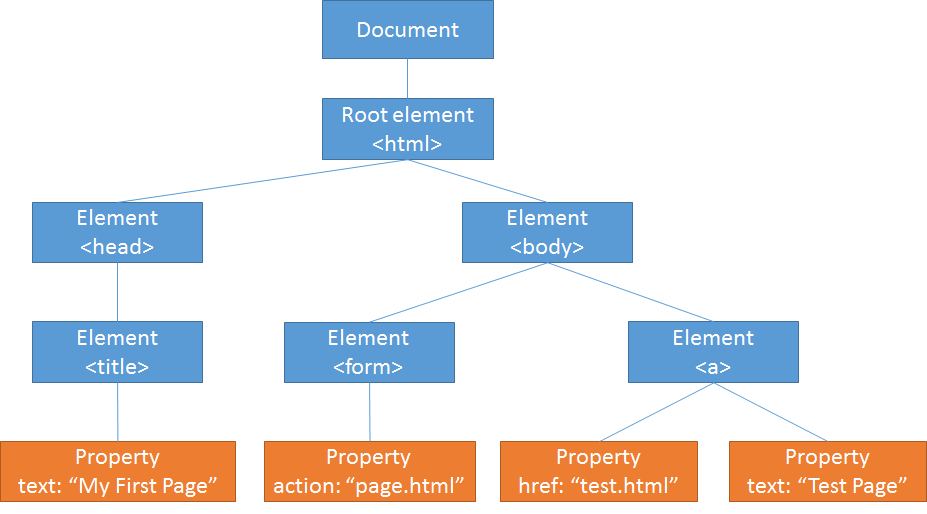
Figure 8-1. Document Object Model
The properties of the document object are script accessible for reading and writing with a reference in the general format shown in Figure 8-2.
document.property
Figure 8-2. General format to reference document properties.
Common properties of the document object are described in the following table. Some of the document properties can be set with scripting; others are read-only.
| Property |
Description |
activeElement |
The currently focused element in the document. |
anchors |
A collection of all <a> elements in the document that have a name attribute. |
body |
Sets or returns the document's body (the <body> element). |
title |
The title appearing in the <title> tag of the current document (read-only). |
referrer |
The URL of the document from which the user linked to the current document by clicking an <a> link (read-only). |
lastModified |
The date on which the current document was last changed (read-only). |
documentElement |
The Document Element of the document (the <html> element). |
domain |
The domain name of the server that loaded the document. |
images |
A collection of all <img> elements in the document. |
URL |
The full URL of the HTML document. |
Figure 8-3. Properties of the document object.
Using Document Referrer
The document.referrer property indicates the page from which a link was made.
You can, therefore, discover the page or site from which visitors arrive at your site, or determine the path through which visitors navigate your site.
Assume, for example, that you have a "private" page that should not viewed without going through a "login" page to validate the visitor's access privileges.
To ensure that visitors always arrive at your "private" page via your "login" page, your "private" page can check its document.referrer property.
In the following script, the checkReferrer() function is called when this private.html page is loaded.
The function looks for the string "login.html" as part of the URL of the page from which this page was linked.
If "login.html" is not part of the document.referrer URL, then arrival at this page was not through the login.html page, and that page is immediately loaded.
function checkReferrer()
{
  if (document.referrer.indexOf("login.html") == -1) {
    window.location = "login.html";
  }
}

window.addEventListener('load', checkReferrer);
Listing 8-1. Code for private.html page to check for arrival from login.html page.
Page Modification Date
Property document.lastModified retrieves the date on which a Web page was last modified.
This information is often provided for a page so the visitor can determine when it was last updated,
saving the visitor from having to scan the page looking for new information.
The following output and in-line script gives the date on which this current page was last updated.
Last modified on:

  document.write(document.lastModified);
Listing 8-2. Code to report when this page was last modified.
Document Body Properties
There are certain properties of the document occupying the browser window that are accessible through the document's body object.
However, most of traditional body object properties are not supported in HTML5 and style object properties are used instead.
These references are are in the following format.
document.body.property
Figure 8-4. General format for document.body properties.
The document.body object supports the standard properties of all HTML elements objects.
Some of the properties can be set with scripting; others are read-only. Notice that certain of these properties have style sheet equivalents.
In these cases, you should use the CSS properties when getting or setting these styles.
| Property |
Description |
topMargin |
The number of pixels of white space at the top of the document (read-only). CSS equivalent:
margin-top:npx (read/write). |
rightMargin |
The number of pixels of white space on the right of the document (read-only). CSS equivalent:
margin-right:npx (read/write). |
bottomMargin |
The number of pixels of white space at the bottom of the document (read-only). CSS equivalent:
margin-bottom:npx (read/write). |
leftMargin |
The number of pixels of white space on the left of the document (read-only). CSS equivalent:
margin-left:npx (read/write). |
innerText |
The text (but not the XHTML) on the page (read/write). CSS equivalent: same. |
innerHTML |
The text, including the XHTML, on the page (read/write). CSS equivalent: same. |
clientWidth |
The width in pixels of the viewable area of the document (read-only). |
clientHeight |
The height in pixels of the viewable area of the document (read-only). |
scrollWidth |
The width in pixels of the scrollable area of the document. Same as
clientWidth if no horizontal scroll bar is present (read-only). |
scrollHeight |
The height in pixels of the scrollable area of the document. The full height of the
document within the window (read-only). |
scrollLeft |
The number of pixels by which the document is scrolled horizontally to the left
(read/write). |
scrollTop |
The number of pixels by which the document is scrolled vertically from the top of
the document (read/write). |
Figure 8-5. Selected document.body properties.
Scripting Document Body Colors
Document body colors can be set dynamically, although it is questionable whether this is a good idea.
Supposedly, your colors were chosen because they best presented your page contents.
If, though, you wish to provide color alternatives, you can make these colors user selectable.
In the following example, a range of background and foreground colors can be chosen by clicking radio buttons.
Background Color:
Red
Green
Blue
Black
White
Foreground Color:
Red
Green
Blue
Black
White
Figure 8-6. Dynamically changing document colors.
function changeBackground(color)
{
  document.body.style.backgroundColor = color;
}

function changeForeground(color)
{
  document.body.style.color = color;
}

function init()
{
  var rbBGRed = document.getElementById("rbBGRed");
  rbBGRed.onclick = function () { changeBackground('red'); };

  var rbBGGreen = document.getElementById("rbBGGreen");
  rbBGGreen.onclick = function () { changeBackground('green'); };

  var rbBGBlue = document.getElementById("rbBGBlue");
  rbBGBlue.onclick = function () { changeBackground('blue'); };

  var rbBGBlack = document.getElementById("rbBGBlack");
  rbBGBlack.onclick = function () { changeBackground('black'); };

  var rbBGWhite = document.getElementById("rbBGWhite");
  rbBGWhite.onclick = function () { changeBackground('white'); };

  var rbFGRed = document.getElementById("rbFGRed");
  rbFGRed.onclick = function () { changeForeground('red'); };

  var rbFGGreen = document.getElementById("rbFGGreen");
  rbFGGreen.onclick = function () { changeForeground('green'); };

  var rbFGBlue = document.getElementById("rbFGBlue");
  rbFGBlue.onclick = function () { changeForeground('blue'); };

  var rbFGBlack = document.getElementById("rbFGBlack");
  rbFGBlack.onclick = function () { changeForeground('black'); };

  var rbFGWhite = document.getElementById("rbFGWhite");
  rbFGWhite.onclick = function () { changeForeground('white'); };
}

window.addEventListener('load', init);

<b>Background Color:</b><br/>
<input type="radio" name="bg" id="rbBGRed"/> Red
<input type="radio" name="bg" id="rbBGGreen"/> Green
<input type="radio" name="bg" id="rbBGBlue"/> Blue
<input type="radio" name="bg" id="rbBGBlack"/> Black
<input type="radio" name="bg" id="rbBGWhite"/> White
<br/><br/>
<b>Foreground Color:</b><br/>
<input type="radio" name="fg" id="rbFGRed"/> Red
<input type="radio" name="fg" id="rbFGGreen"/> Green
<input type="radio" name="fg" id="rbFGBlue"/> Blue
<input type="radio" name="fg" id="rbFGBlack"/> Black
<input type="radio" name="fg" id="rbFGWhite"/> White
Listing 8-3. Code to dynamically change document colors.
Scrolling Events
The window object responds to user events just like other page elements.
It recognizes mouse events, load events, and others.
Also, it responds to scroll events that occur when the user moves the scroll bar or mouse scroll wheel to scroll the page.
These scroll events are trapped with an scroll event handler coded in the window object.
In fact, any scrollable page element has an scroll event handler that can trigger scripts.
As an example of trapping and responding to scroll events, click the following button to display a "floating" menu containing links to sections of this page.
The menu maintains its fixed position in the document window during page scrolling.
Figure 8-7. Displaying a floating menu.
The menu is a division configured as shown below. The division must contain a position:absolute style setting in order to adjust its page position with scripting. It is positioned a fixed number of pixels from the left margin of the page; its vertical position is not fixed, being calculated by a script that always positions it 100 pixels below the current scroll top position of the page.
<div id="menu" style="position:absolute; width:250px; height:200px; left:30px; border:ridge 3;
padding:5px; background-color:#F0F0F0; z-index:100;">

  <h4 style="text-align:center">Menu</h4>

  <a href="#HEAD1">Scripting Document Colors</span></a><br/>
  <a href="#HEAD2">Using Document Referrer</span></a><br/>
  <a href="#HEAD3">Page Modification Date</span></a><br/>
  <a href="#HEAD4">Document Body Properties</span></a><br/>
  <a href="#HEAD5">Scrolling Events</span></a><br/>
  <br/>
  <input type="button" id='hideScrollBtn' value="Hide" /> <br/>
  <input type="button" id='showScrollBtn' value="Show Floating Menu" />

</div>


function scrollMenu()
{
  var pY = document.documentElement.scrollTop + 100;
  document.getElementById("menu").style.top = pY + "px";
}

document.getElementById("hideScrollBtn").addEventListener('click', function(){
  document.getElementById('menu').style.visibility='hidden';
});

document.getElementById("showScrollBtn").addEventListener('click', function(){
  document.getElementById('menu').style.visibility='visible';
});

window.addEventListener('scroll', scrollMenu, false);
Listing 8-4. Code to create a scrolling menu division.
As you can tell by their href attributes, links are to on-page sections identified by <a name="name"> links.
These links are associated with side headings appearing on the page.
Positioning of the division during scrolling is handled by the scrollMenu() function.
It is called by an scroll event handler coded in the window object to respond to any scroll event associated with the page.
function scrollMenu()
{
   var pY = document.documentElement.scrollTop + 100;
   document.getElementById("menu").style.top = pY + "px";
}

window.addEventListener('scroll', scrollMenu, false);
Listing 8-4. Script to scroll menu division.
The position of the menu division is based on the current scroll position of the page.
The number of pixels the page is currently scrolled from the top of the document is given by the document.documentElement.scrollTop property.
The function sets the menu division's top style property to 30 pixels beyond the current scrollTop position of the page.
Each time the page is scrolled, this calculation is made to keep the menu division in the same position in the browser window.
The following button displays a small scroll box using the same scrolling and positioning properties as the previous menu division.
Click and hold down the mouse over the up or down arrows to scroll this page.
The scroll box moves with the document scroll to maintain its fixed position in the browser window.